How to check the motherboard for functionality?
Motherboard - the most important component of the system unit, without which the PC cannot operate. This small device can become damaged, and to make sure that it is this component that is causing your computer to malfunction, it needs to be checked. Next we will talk about ways in which this can be done.
Method one: visual inspection
Check the motherboard for visible defects. This could be a crack or a burnt area. Check the capacitors on the board for swelling. By the way, it is capacitors that are most often the culprits of board malfunctions. If you find exploded or swollen capacitors, as well as other listed reasons, then the only option here is to replace the entire component with a new one. Or submit an application for the development of a printed circuit board.
Method two: Reset CMOS
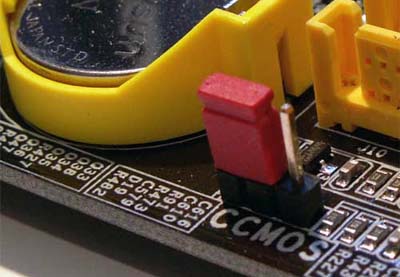
On the motherboard, find the battery, next to which there is a reset jumper. If you have difficulty finding, then look for the markings CCMOS or CLR_CMOS. This jumper has 3 contacts, where the first two are closed by default. To return the settings to the factory settings, you need to close contacts 2 and 3 for 20 seconds, then return the jumper to the main position.

Method three: through the processor and RAM
Disconnect power from the mains. Other components are connected to the motherboard using cables. It is necessary to disconnect all cables except power, as well as devices such as the drive and hard drive. All cards (video card, etc.) must be removed from the slots. You also need to get RAM.
That is, in addition to the power supply, only the processor along with the fan and the internal speaker should remain installed and connected to the motherboard. Once you are sure, connect the power supply to the network.
In this case, you need to start the computer by shorting the contacts of the front panel connector located on the motherboard (PWR). You need to get your bearings to the signal from the speaker (speaker) or lack thereof.
If you hear a signal, this means that the motherboard is most likely working. The signal itself indicates a problem with the RAM (after all, we previously disabled it). The signal may vary depending on the board model, but most often it is a continuous beeping sound.
But if you don’t hear a signal, then this definitely indicates a board malfunction; accordingly, in this case, all that remains is to replace it.
Method four: for motherboards without a built-in video card
Disconnect Power Supply from the network. Disconnect from the motherboard and remove all devices described in the third method. The following must remain connected to the motherboard: processor with fan, speaker, one RAM slot.
Then connect the power supply to the network and start the PC in the same way as described in the previous method, by closing the contacts.
Again, you should focus on the speaker. In this case, the squeak will mean a video card error (which we previously disabled and removed from the slot). The sound may be different, but most likely it will be 1 long signal and 3 short ones. If you hear a signal, then it is almost 100% that the motherboard is working.
If there is no beep, then try changing the RAM module to another one, and also installing it in a different slot. To do this, you must go through the verification procedure first.
If the motherboard passes the serviceability test, then you need to look for the problem in other components, for example, in the hard drive or video card.

